Introduction
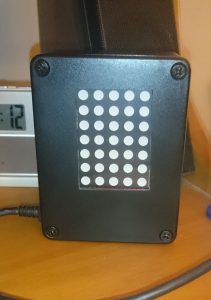
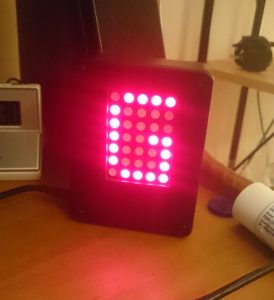
I’ve been playing around with a red 5×7 dot matrix LED display module which I have had in my spares box for a while. I thought about making some sort of scrolling message display as an Arduino project but could not find any more of these modules online as I’d need at least another seven. However I did have an Arduino Nano, a small case with a scratched lid and a piece of veroboard that just happened to fit the box exactly.
I needed to practice my programming skills and after a few attempts of trying to get the display connections right I was able to make some characters appear on the display. It wasn’t anything useful so following a few examples on the internet I ended up with a scrolling message that was hard coded into the program.

For this to be of any use I needed to be able to upload messages to it so I wrote some code to store the incoming serial data into a buffer then into an array to be displayed. However I couldn’t get it working right; it took ages to transfer the message and every time you wanted to change the message you had to power it off and on again.
It turned out I’d got some of the curly braces in the wrong positions in one of the ‘for’ loops which was causing the delays. I stuffed it into the case (the scratch was on the part which would be cut out for the display window) and then thought, that’s nice and put it in the cupboard and forgot about it.
The other day I dug it out and re-wrote the serial code and I now have a useable message display albeit with only one character displayed at once. It was good practice anyway and those parts wouldn’t have got used for anything else.
Anyway here’s the project:-
The code
The code has gone through several revisions as I wanted to be able to overwrite the message without powering off the display so this now works. I also wanted to make it a standalone device but I was unable to get the eeprom to work; I could get the message stored in the eeprom OK and read back to the serial port OK but it always displayed “32” on the LED display regardless of message content.
I think this is the way the eeprom stores the data but for the life of me I could not get it to work. Maybe Ill give it another go in the future but for now here is the completed source code:-
Update Feb 2018 – I have now got the eeprom to work. Messages are now remembered and displayed at the next power on. The message can be overwritten by sending another via the serial port. I have also learnt how to tell the compiler to keep text strings in flash memory instead of copying to SRAM which was wasting space. The updated source code can be found below:-
Scrolling message display with clock – updated
Building the circuit and case
I do not have a circuit diagram but the pin numbers used are explained in the code and I have also included the datasheet for the LED module I used. Most have the same pinouts but if you wanted to make this project you will have to check and change wiring accordingly. 220 ohm current limiting resistors will be required as the microcontroller’s pins will be directly connected to the LED module. This isn’t the best way to do it but it saves on components and is ideal for a single module.

The case is a standard ABS project case with a cutout made by drilling the edges of the cutout then removing excess plastic with a stanley knife. I filed the edges smooth and stuck some clear perspex behind the cutout to protect the module from damage. A hole was cut into the side for the USB cable which is connected directly to the USB port on the nano.
Anyway here is a video of it working:-
Improvements and ideas
As I had mentioned earlier I plan to use the eeprom to store a message so the unit does not have to be connected to a PC / laptop and can be used standalone.
Another idea is to use a bluetooth module which can receive the message and output it in serial format. The library softwareserial would come in handy here. Also a GSM module could be another possibility of adding more functionality so text messages sent could be displayed.
I also added a clock function so first it will display the date and time and then scroll the message which can be hard coded or updated via serial.
If I decide to improve this project Ill update here.
Update Jan 2018 – the Fart Clock
Well I said I would update if I improved the scrolling message display. This revision adds a leading zero if the hour or minute was less than 10 e.g it used to display 10:6 now shows 10:06. The EEPROM now works; messages which are sent via serial port now are remembered even if powered off.
I have also been playing with some gas sensors. Revision 3 now detects fart gas (methane and hydrogen) by using a MQ-2 sensor. If a threshold has been met the unit will replace the message displayed after the clock with a funny message depending on the severity of the fart. When the fart clears the message sent via the serial port is displayed again. Can be adapted to display anything if a sensor input threshold is met.
Please note that due to the variations in sensors / sensor modules I have put sample thresholds in the code. You will need to adjust these threshold values accordingly depending on the sensor you have. E.g one sensor outputs 2-4V depending on gas concentration whereas mine gave 20mv in clean air and went up to 1V when exposed to some gas. As a guide an analog value of 400 is 2V.
You can download the revised code here
Please note that the scrolling message base code is based on Eric Lathrop’s code which I had used as an example and was unable to find it again. Anyway I came across it today and his link to his Github page is here https://github.com/ericlathrop/LedGrid
I’ve updated this project so that it now stores the message in EEPROM so you do not have to re-upload it at every power on. It can now be used standalone so this is a much more useful project now.
I made two versions; the standard clock plus message scrolled across the display and the other is a version that detects gases present in a fart and displays a message depending on the amount of fart gas present. If there’s no fart detected it behaves like the first version.
A quick update on this if you are building the fart clock version. I’ve been busy building another gas detector using an MQ135 which I found to drift considerably. I guess the MQ2 will be the same so if this device is left powered for a long time the no gas present analog voltage will change. A new sensor should be ‘burned in’ for at least 24 hours but if it has been in storage for a long time this period can be longer.
My MQ135 gave an analog value of 10 when first used raising to 15 after 24 hours. After being powered on continuously for 2 weeks this value had risen to 52. Leaving the sensor off for a week made the no gas analog value to be 33 but this rose back to 52 after a day.
Bearing this in mind be aware you may need to adjust the analog values & thresholds within the first few weeks depending on your sensor.